Can I install a water softener myself?
While we recommend hiring a professional, you can install a water softener without a plumber if you have moderate to advanced plumbing skills and are comfortable with DIY projects. You’ll also want to ensure you have the right tools and an understanding of your water supply connections. However, some softeners can have a more complex installation than others, so it's a good idea to read through the manual first to determine if you feel confident or if hiring a plumber is a better option.
Where to install a water softener
Before you can begin your installation, you’ll need to choose where your softener will go. There are several things you’ll need to consider when selecting the best location for your water softener, including:
- Proximity to the entry point for your home’s plumbing, as close to the main water line as possible
- A suitable flat surface
- A location that allows accessibility to the tank from all sides
- Access to an electrical outlet for power
- Access to a drain for water discharge
Typically the best place to install a water softener is in the garage, basement, or utility room if you have one. Other factors that can influence where you put your softener are also your state’s climate, available space, and other water treatment equipment you may already have. Consult with your manufacturer’s instructions to learn specific details regarding where best to set up your water softener.
Tools and equipment needed for installing a water softener
To install your water softener you’ll need the proper equipment and materials. Softeners will come with the components for the system, but additional tools and materials will have to be purchased separately. Here’s what you’ll need:
- Adjustable wrench
- Screwdrivers
- Pliers
- Drill
- Tape measure
- Pipe cutter
- Bucket
- Plumber’s tape

Optional items you might need depending on your home and water softener manufacturer:
- Plumbing pipe fittings
- Flexible supply tubes
- Channel locks
- Copper wire and clamps
- Crimp rings and PEX tubing
- Garden hose
- Hacksaw
- Solder flux and/or blow torch
How to install a water softener
The installation process will vary by system and manufacturer, but these are the steps you should expect to complete when installing your water softener:
1. Shut off the water and drain the water lines

Your first step will be to turn off the main water supply valve to prevent water from leaking while installing the system. It’s usually located close to your water meter or where the water line enters the home. To find the shut off point, check outside in the front yard near the curb or, if you have an older home, in the basement, garage, or utility closet. You can also find your valve in your property inspection report. Once you’ve shut off your supply, drain the water by opening a sink faucet until it stops.
2. Install a bypass valve
Check to see if your water softener has a bypass valve and install it if you do. The bypass valve allows you to shut off the water entering your softener in case it needs repairs or maintenance. If you don’t have one, you can buy a bypass valve separately and connect it to your water softener.
3. Connect the softener to the water supply line
Use either hard-pipe or flexible supply tubes to connect the water supply line to the water softener. Between the two, we recommend the flexible supply tubes because it’s easier to remove or bypass the system for future repairs or maintenance. Expect to cut out a section of the water supply and then install adapters that work with the flex tube fittings. Once the tube is connected to the water supply line, you’ll need to attach it to the inlet port located on the unit.
4. Connect the drain line
Most water softeners come with two drain lines: one for removing discharge water during the backwash cycle and an overflow line to prevent the tank from filling up beyond its capacity. Both connect to your home drainage system, typically a floor drain, utility pool, or standpipe. Ensure your drain line is secure and sloped downwards for proper water flow.
5. Prepare brine tank
Connect the mineral tank to the brine tank using more tubing and clamps. Then prepare your brine tank by filling it with the quantity of water and salt recommended by the manufacturer.
6. Run a backwash cycle
Depending on your softener, this can be completed manually or after turning on your unit (you can find out which you have in your manual). If you have a manual backwash cycle, you’ll first need to slowly introduce water to your tank by partially opening the main water supply valve about ¼ of the way. Allow trapped air to escape by letting the water run for a while until you can hear a steady stream without any hissing sounds. This means all the air has been purged and you can fully open the valve. Let the tank fill, then plug in your unit.
If your backwash cycle is activated electronically, you’ll need to start your system by opening the main shutoff valve. When water is flowing freely, plug in your water softener and follow the start-up steps until you reach the menu to perform a backwash (regeneration) cycle.
7. Check for leaks
Now is a good time to check for leaks. Look around every pipe, tube, and connection to make sure you don’t need to tighten or adjust anything. Common culprits for leaks include the rotor valve, the brine tank, the drain line, and any connections or pipe fittings where water is entering or leaving the unit. Adjust where needed, then run another cycle to ensure all leaks have been addressed.
8. Program the control valve
If you had to backwash your unit manually and haven’t set up your system yet, the next step will be to set up your control valve. You may be required to program the time of day, the number of people living in the home, and the correct hardness setting. You can find out your hardness setting by looking up your most recent water quality report or having your water tested.

9. Run a regeneration cycle
For some water softeners, your backwash cycle and regeneration cycle might be the same thing. However, for most, backwashing is considered the first step in the regeneration cycle. Backwashing is the process of reversing water flow to flush out dirt, debris, and sediment from the resin tank. The regeneration cycle involves cleaning and recharging the water softener resin beads so they can soften more hard water. A backwash takes about 10 minutes, while a regeneration cycle can take between 80-90 minutes.
Shop Aquasana’s water softeners
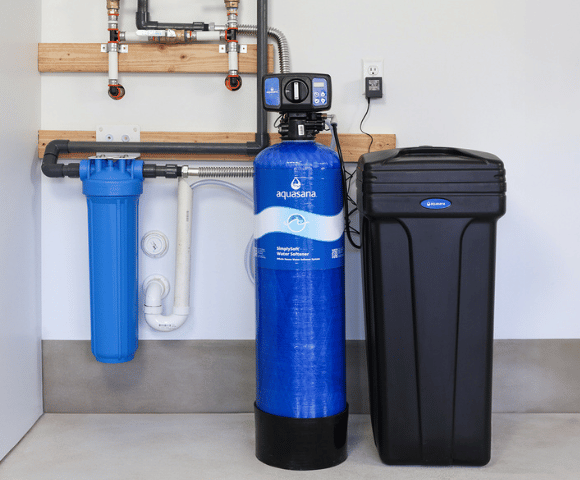
Installation for water softener can vary based on make and model, so if you’re interested in installing the system yourself, it’s important to make sure your manufacturer provides detailed and clear instructions. For our DIYers, Aquasana’s SimplySoft® Grain Softeners feature comprehensive installation instructions in a manual and video walkthrough. For questions about installing our water softeners or hiring a professional to complete the process, contact our Water Experts.
WHOLE HOUSE WATER SOFTENER
SimplySoft® 40,000 Grain Softener
Reduces minerals that cause hard water, providing softer, scale-free water from every tap in your home.
.png)


